

Featured Image
The Featured Image option is the default setting for the page. Simply click the Set Featured Image button to upload an image, or select an image from the Media Library.
Recommended Image Size
The banner images are full width so the chosen image must be large in order to look good on all screen sizes. Optimal image settings are: 2000 pixels wide, resolution of 72 dpi and quality level 8, and baseline optimized. The resolution and quality level will help to create a small image file size so the website loads fast.
Featured Image Settings
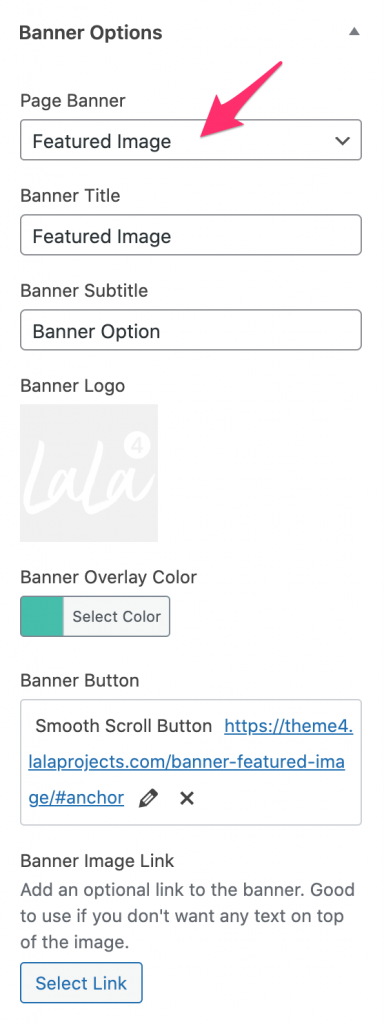
There are a number of settings available within the Banner Options menu. The banner text will default to display the Page Title. If you would like to add more info to the banner you can use the following options.
- Banner Overlay Color: This optional setting allows you to add a transparent color overlay to a banner image.
- Banner Title: This overwrites the Page Title.
- Banner Subtitle: This appears just below the Banner Title.
- Banner Button: This appears just below the Banner Subtitle.
- Banner Image Link: This is used if you want the entire banner image to link to something.
- Banner Logo: You can now upload a logo (72 dpi PNG) to the center of your banner. The logo will appear above the banner heading.
More Insights on Featured Image
Even if you are using the slide show or video function, we still recommend that you add a featured image for two reasons:
- Mobile phones will not play background videos due to mobile network bandwidth issues, so the background video will default to the featured image on mobile.
- When people share your page, the featured image is part of the metadata. This will be displayed on services that support metadata. Facebook, Pinterest, and Slack are examples of services that use metadata.
Smooth Scroll Anchor Function
There is a clever smooth scroll anchor function programmed into the banner button. You can see an example of it in action on this page by clicking on the button in the banner above. It will auto-scroll the page down to this part of the page.
Two Easy Steps to Setting up Anchor Function
Step One – Set the Anchor
In the WordPress page editor click on the three-button menu to ‘Edit as HTML’. Then add an ID to the heading that you wish to set as the Anchor. Here is an example of the code:
<h3 id="anchor">Smooth Scroll Anchor Function</h3>Step Two – Set the Link
Once the Anchor is set, you’ll need to add a corresponding ID to the URL link used within the button. In a link, the ID is represented as a hashtag #. Here is an example of how to build the link:
https://theme4.lalaprojects.com/banner-featured-image/#anchor